The Back Story:
After a few failed experiments in high school art class, I avoided clay altogether until I graduated college. Then I started seeing online the beautiful things people were making out of polymer clay. I tried working with polymer clay myself and got really into it! This eventually led me into the world of miniature scale models and 3D art projects in general.
However, after moving overseas I realized that air dry clay was much easier to access, and of course much cheaper, than polymer clay. So I got up the courage to give air dry clay another try with this fairy house project. It went much better than I expected! Air dry clay is definitely going to be one of my staple materials moving forward. The possibilities suddenly seem endless!

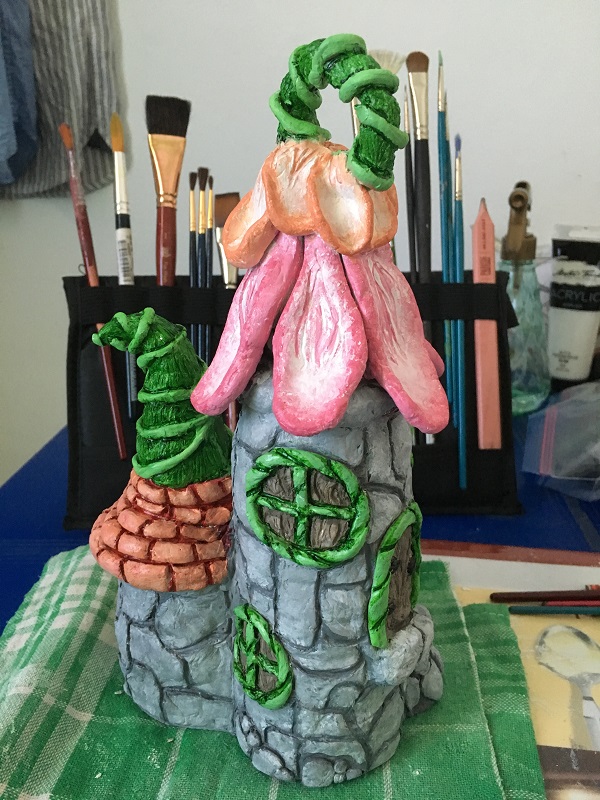
I chose the fairy house because it seemed like a fun way to experiment with textures. The whimsey of a fairy house also makes it a very forgiving project. I’m not exactly happy with the flower petal roof but overall I really enjoyed the project.
Materials:
- Aluminum foil
- Recycled pieces like glass jars or plastic bottles for an armature base
- Glue gun, strong glue, or tape to keep aluminum foil and armature in place.
- Cutting devices like scissors and box cutters to shape the armature
- Air dry clay. I used the brand DAS, the color white, 500 grams.
- Plastic cup/tub for water to wet your hands wet as you work with clay.
- Sculpting/shaping tools for detail work. These can be everyday household objects.
- Acrylic paint and paintbrushes

Steps:
- Form a basic armature using recycled containers such as glass jars and plastic bottles. Combine pieces with hot glue.
- Fill out the desired shapes using tin foil. (Some shapes might also require cardboard and/or wire.)
- Start applying clay into basic shape. Add additional detail with sculpting tools.
- Let dry. It took mine 48 hours to dry completely.
- Paint! I worked in layers from dark to light.

Tips:
- Dry as slowly as possible. As exciting as it is to start painting, the clay will crack if dried too fast. While drying, keep in moist, cool, dark area if possible. Definitely don’t use a hair dryer or heat source to expedite the process. Since I live in the tropics without much AC, the natural humidity in a dark part of the house was sufficient to prevent cracking. You could further slow the process by misting the sculpture with a spray bottle or placing a plastic bag or moist rag loosely over it as it dries.
- Avoid thin pieces. Try to design a structure that will be well-supported and less likely to break. Thin pieces break more easily and also dry faster, which makes cracking more likely.
If you’re interested in similar projects, you can check out Creative Mom. She was my primary inspiration for this piece.
Have you worked on a similar project? How did it go?
